RM – #2 Button Troubleshooting

May. 29th, 2024 | David Soohoo

Follow this help article if you are having trouble with the #2 button.

Applicable Models
  • RM-55N-R
  • RM-55P-R
  • RM-50N-R
  • RM-50P-R

Technical documents such as manuals and exploded diagrams can be found here.


Reported Issues / Complaints
  1. The #2 cook button will not stay down at all.
  2. User has to wedge something on top so the #2 button stays down.  The cook time then needs to be monitored manually, or else the rice will burn.
  3. Pilot burner lights but main burner does not light.
  4. There is play in the #2 button switch.
  5. When the #2 cook button is depressed, it slowly comes back up and the flame gets weaker.
  6. The main burner flame is suddenly weak compared to what it used to be.


DIAGNOSIS
  1. Turn the gas off by turning the black gas valve on the front of the unit to the vertical position.
  2. Remove the rice pot from the unit and set it aside.
  3. Push the shut off spring assembly down.  Make sure it springs back up with no issue and does not get stuck.
  4. Push down on the #1 button and then release it to allow it to pop back up.  During operation, you must always push the #1 button down before trying to push the #2 button.
  5. Push down on the #2 button.
  6. If the #2 button:
    1. Does not stay down, skip the remaining diagnosis steps and move onto the next section of this guide.
    2. Does stay down but the flame is low or slowly decreases, first verify that the gas supply meets specifications and that the gas pressure regulator is installed. Then follow the diagnosis steps again.  If the issue persists, skip the remaining diagnosis steps and move onto the next section of this guide.
    3. Does stay down and the flame looks ok, the #2 button is working properly.


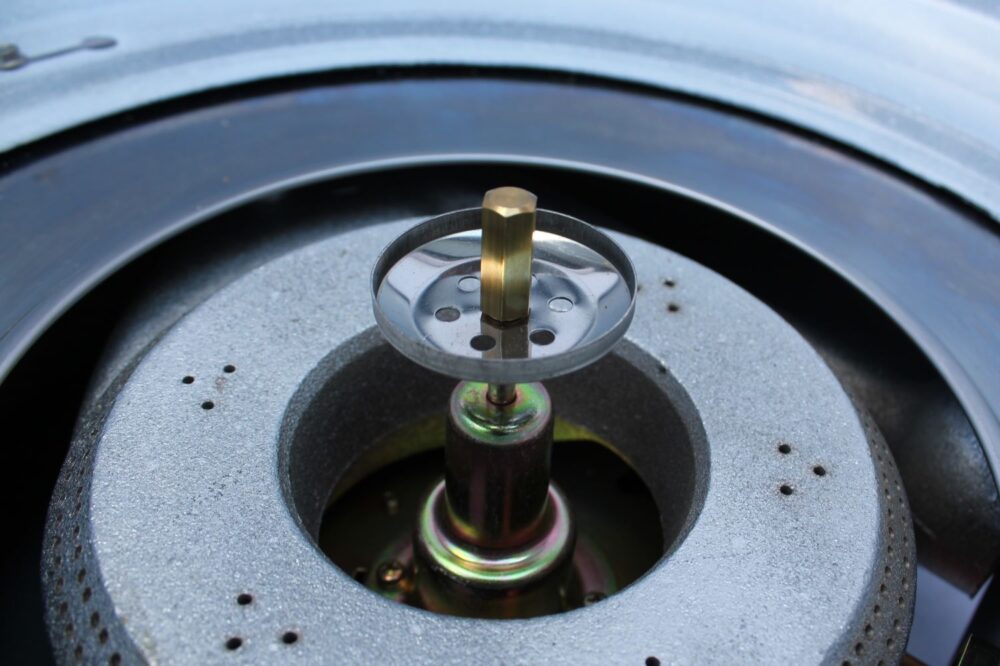
Now verify that the unit’s auto shut off feature is working properly.

  1. Place the pot back into the rice cooker and turn the gas supply back on.
  2. Push the #1 button down and repeat until the pilot is lit.
  3. Push the #2 button down.  If the burner does not turn on, follow the RM – Auto shut off troubleshooting steps.  If it does, the #2 button is operating properly.
Shut off stem assembly

Item # 56857

Mounted in the middle of the base of the unit

Rice cooker controls


Operational Synopsis

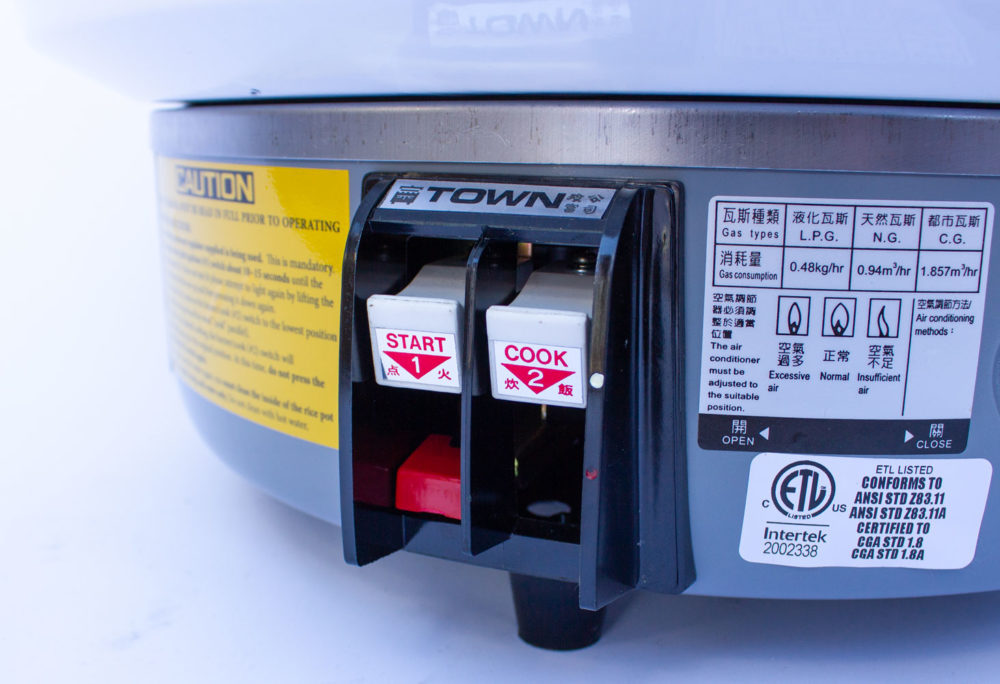
The #1 button on the left simultaneously lights the pilot burner and triggers a piezoelectric spark.  This button must be pushed down first The #1 start button controls the piezo igniter and will pop back up after being pushed down. The red button underneath the #1 start button is what releases gas to the pilot, and will stay down when pressed.  You may pull up on the red button to turn the pilot off.

The #2 button on the right lights the main burner.  It must be pushed down after the #1 button and after the pilot is lit.  When operating properly, this button will stay down until the rice is done cooking.  It can also be pulled up to turn the main burner off.

By design, the #2 button on the RM series rice cookers can’t be pushed down without the #1 button already in the down position. Allowing the #2 button to be depressed without the #1 button down and pilot lit would release a dangerous amount of gas. Sometimes, users will mistakenly force the #2 button down before engaging the #1 button.  This can bend an “L” shaped piece of metal inside the unit, causing the symptoms noted above.

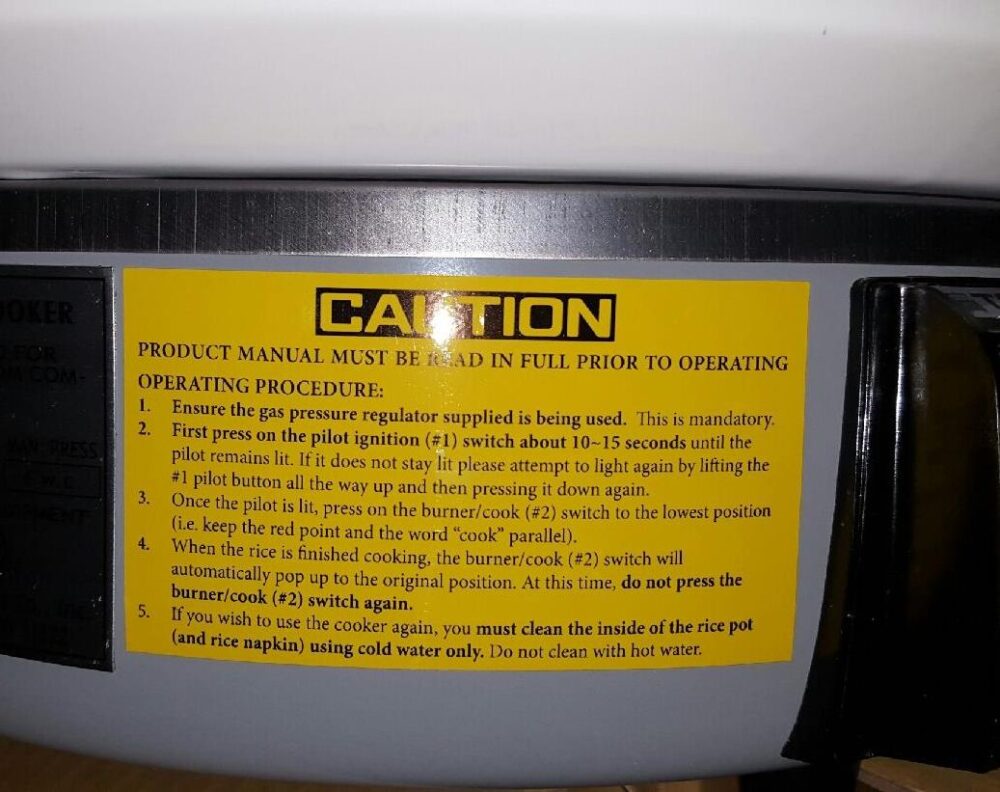
On site repair of this part can be performed by someone who feels comfortable working with basic tools.  The repair is purely mechanical, requiring the removal of panels and the bending of the “L” piece back to an upright position.  It does not involve removing or modifying the gas line in any way. In more severe cases, the shaft that the buttons rotate around may be bent or broken, requiring its replacement.  A yellow caution label on the base of the unit details the proper operating procedure.

Operating procedure sticker
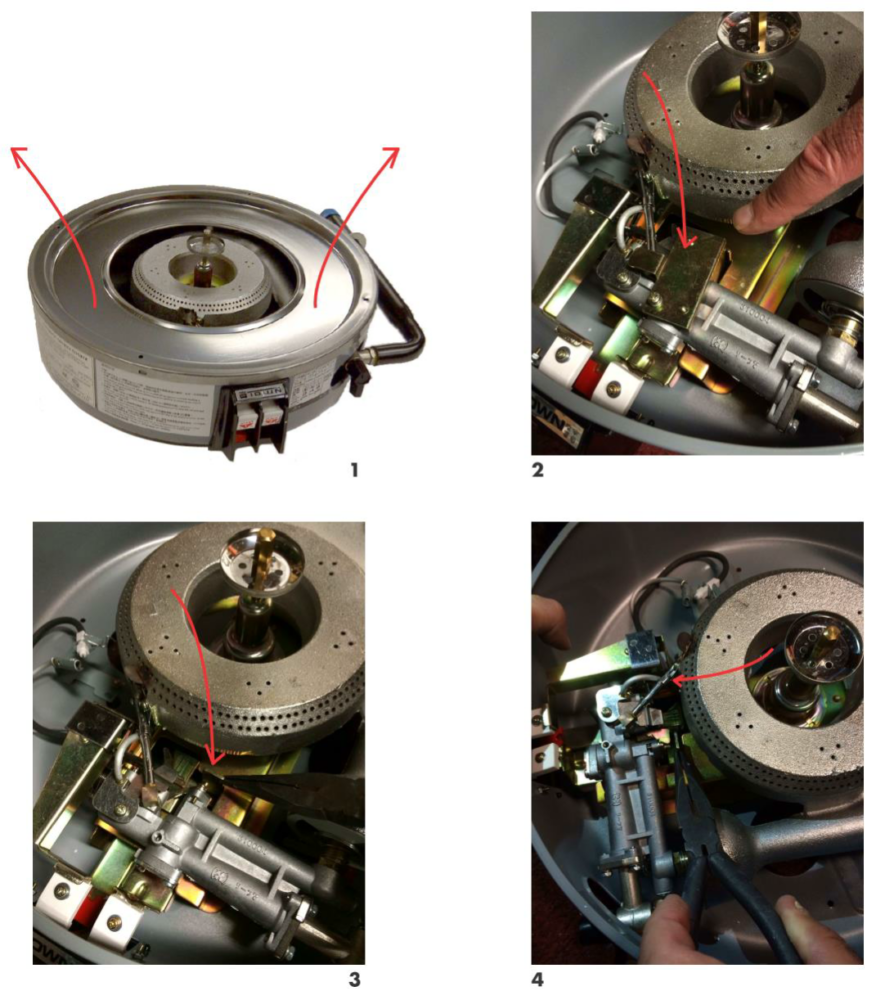
 

Solution

Tools Required

  1. Phillips head screwdriver
  2. Needle nosed pliers

Before beginning, make sure the gas to the unit is off by turning the black handle on the gas valve to the vertical position.  Reference the Exploded Diagram for part numbers.

  1. Remove the 3 screws around the outside perimeter of the unit which hold the shroud (#7 in exploded diagram) and the stainless steel cover (#8 in the exploded diagram) to the base of the rice cooker. You will need a Phillips head screwdriver for this. Once this is done, the unit base with all the internal parts should be exposed.
  2. Remove item #32. This is a brass plate that is at the top of the assembly above the #1 & #2 cook arms (inside the unit). This brass plate (#32) is held in place by one screw. Once this plate is removed, you should be able to look down into the assembly of the #2 button arm (#17).
  3. Right in the middle of the #2 button arm is an “L” shaped piece of metal (see red arrow in the third step of the diagram below). If you manually move the #2 button arm up and down, you should see this piece of metal clearly.
  4. This piece of metal needs to be as close to vertical as possible.  On this unit, it’s likely bent towards the rear. Use a pair of needle nosed pliers to bend it back to the vertical position.
  5. In more severe cases, the shaft (#19) is bent or broken and needs to be replaced.

Once the “L” shaped piece of metal on the #2 button arm is straightened to the vertical position and the shaft (#19) is replaced, the problem should be solved.  To check, press down on the #1 button. Then push down on the #2 button. The #2 button should stay down and engaged when you remove your finger.

Illustrated repair steps


Reassembly & Testing
  1. Reinstall the brass plate (#32) and secure it with the screw.
  2. Reinstall the shroud (#7) and stainless steel cover (#8).
  3. Put the rice pot into the unit.
  4. Turn the gas valve handle to the on (horizontal) position.
  5. Pour 3-4 cups of water into the pot.
  6. Light the pilot using the #1 button.
  7. After the pilot is lit, push the #2 button to light the main burner.

The unit should cook all the water until it almost completely evaporates and then it should cut the main burner off.  If this occurs, the rice cooker is operating properly.

If not, one or two sensors may need to be changed. See RM – Auto Shut Off Troubleshooting for more info. If these are replaced and issues are still found, contact Town for further assistance.


RM-55 & RM-50 Product Overview Video


Still having problems?

Town’s commercial gas rice cookers carry a 6 month mail in warrantyIf your unit is under warranty, submit a repair request inquiry and we’ll be glad to assist.

We’ll process an RMA, and send you details for warranty repair. Per the warranty terms, the customer will be responsible for shipping the unit back to a designated repair facility. The original packaging must be used if available. Town is not liable for shipping damage due to insufficient packaging. If the issue is covered under warranty, Town will take care of all diagnostic, repair, and return shipping costs. We will ship the repaired unit to the shipping address provided. You may find more about our mail in warranty here.

We do not have a loaner program and recommend having a backup rice cooker for restaurants in which rice is a staple.


Warranty Repair Request                             View Rice Cookers